Tuesday, 25 June 2019

HAProxy


HAProxy                                                                                                                    
Introduction:
HAProxy, which stands for High Availability Proxy. Its most common use is to improve the performance and reliability of a server environment by distributing the workload across multiple servers.
HAProxy is a popular open source software TCP/HTTP Load Balancer and proxying solution which can be run on Linux, Solaris, and FreeBSD.
It is used in many high-profile environments, including: GitHub, Imgur, etc...


                                                                       HAProxy Diagram

Frontend:
A frontend defines how requests should be forwarded to backends. Frontends are defined in the frontend section of the HAProxy configuration. Their definitions are composed of the following components.
A set of IP addresses and Port no.
o    Ex: 192.xx.xx.xx,*:443.
Backend:
A backend is a set of servers that receives forwarded requests. Backends are defined in the backend section of the HAProxy configuration. In this most basic form, a backend can be defined by: 
  • A list of servers and Ports.
  •  Which load balance algorithm to use.

A backend can contain one or more servers in it. Adding more servers to your Backend will increase potential load capacity by spreading the load over multiple servers.
Increase reliability is also achieved through this method, if some of backend servers become unavailable.

Load Balancing Algorithms:

The load balancing algorithm that is used to determines which server, in Backend, will be selected when load balancing.

Roundrobin: Roundrobin selects servers in turns. This is the Default algorithm.

Leastconn: Selects the Server with the least number of connections. It is recommended for longer sessions.


HAProxy Installation:
  • # sudo apt-get install -y haproxy
                      (or)
  • # sudo yum install -y haproxy

HAProxy configuration
HAProxy configuration can be found at /etc/haproxy/haproxy.cfg
global
    daemon
    maxconn 256
defaults
    mode http
    timeout connect 5000ms
    timeout client 50000ms
    timeout server 50000ms
frontend http-in
    bind *:80
    balance roundrobin
    default_backend servers
backends servers
     server1 192.xx.xx.xx:8080 check maxconn 32
      server2 192.xx.xx.xx:8080 check maxconn 32

Enable HAProxy
  • We need to enable HAProxy to be started by the init script
            /etc/default/haproxy.
  • Set ENABLED option to 1 as:
                                           ENABLED=1
To Start HAProxy service:
  • # service haproxy restart

Testing Load-Balancing and Fail-over
  •   Start the service backend servers
  •   Then test in HAProxy Servers
                     # while true;do curl http://localhost; sleep 1; done
  • Open HAProxy IP in Browser and check load-balancing and fail-over

Monday, 25 February 2019

WebLogic Default Admin User's Password change/Reset

   
Situation: Change/Reset the WebLogic Default Admin User's Password
Solution:  we have two methods to change the WebLogic Default Admin User's Password        
  •            If you know the Admin password
  •         If you don’t know the Admin Password, we need to reset the Password.

è If you Know the Admin Password

Ø  Login into Weblogic console.

Take "Lock & Edit"
Home -->Summary of Security Realms -->myrealm >User and Groups -->Users
Click on "Customize this table."
Filter by Column: Name --> Enter WebLogic Admin UserName as part of "Criteria."
Click "Apply."

Ø  Changed WebLogic Admin User Password:

Click on "WebLogic Admin UserName" --> Go to Passwords Tab.
Enter a new password for:
*New Password:
*Confirm New Password:
Click on "Save."

Ø  ShutDown Managed Servers:

Login into WebLogic console.
Take "Lock & Edit"
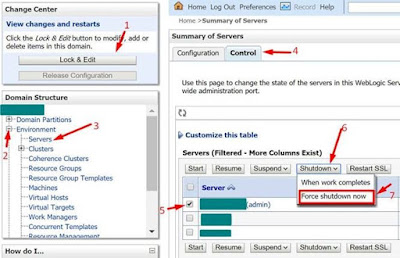
Environment --> servers --> Control --> Check All managed server --> Shutdown-->Force Shutdown now.

Ø  Shutdown Weblogic Admin server

            Take "Lock & Edit"
Environment --> servers --> Control --> AdminServer --> Shutdown-->Force Shutdown now.

Ø  Change Boot.properties

# $DOMAIN_HOME/servers/$ADMINSERVER_NAME/security
# cp -p boot.properties boot.properties_bkp
# vi boot.properties
username=” weblogic username”
password=” New Password”

Ø  Clear Tmp and cache folders for WebLogic Servers

# $DOMAIN_HOME/servers/SERVER_NAME
# rm -R tmp cache

Ø  Start Weblogic Admin server

# $DOMAIN_HOME/bin
# nohup ./startWebLogic.sh &

Ø  Start Weblogic Managed Servers

Login into Weblogic console.
Take "Lock & Edit"
Environment --> servers --> Control --> Check All managed server --> Start.

è If you Don’t Know Admin password, Reset Admin Password

    Ø  ShutDown Managed Servers:

Login into Weblogic console.
Take "Lock & Edit"
Environment --> servers --> Control --> Check All managed server --> Shutdown-->Force ShutDown now.

    Ø  Shutdown Weblogic Admin server

Environment --> servers --> Control --> AdminServer --> Shutdown-->Force ShutDown now.

  Ø  Move of LDAP folder for Adminserver and Manager server.


# $DOMAIN_HOME/servers/SERVER_NAME/data/ldap
# mv ldap ldap_bkp
*Note: If we move ldap folder, We may lose the privileges for user Global roles.

Ø  Set the Environment Variable

# $DOMAIN_HOME/bin
# . ./setDomainEnv.sh

Ø  Backup  DefaultAuthenticatormyrealmInit.initialized file from ldap folder.

# $ DOMAIN_HOME/servers/AdminServer/data/ldap
#  mv DefaultAuthenticatormyrealmInit.initialized DefaultAuthenticatormyrealmInit.initialized_bkp

Ø  Create a new initialization

                   Create a new initialization file for the default authenticator by running the                                             below command that creates a new DefaultAuthenticatorInit.ldift file in the                                          $DOMAIN_HOME/security subdirectory
                   #java weblogic.security.utils.AdminAccount <username > <newpassword>                                           $DOMAIN_HOME/security

 Ø  Create a boot. Properties file with new username and password already used on the previous step.

# $DOMAIN_HOME/servers/AdminServer/security
# cp -p boot.properties boot.properties_bkp
# vi boot.properties
username=” weblogic username”
password=” New Password”

Ø  Start Weblogic Admin server

# $DOMAIN_HOME/bin
# nohup ./startWebLogic.sh &
Once the admin server comes up and running Weblogic Server will encrypt the password in boot.properties file.

Ø  Start Weblogic Managed Servers

Login into Weblogic console.
Take "Lock & Edit"
Environment --> servers --> Control --> Check All managed server --> Start.
                     

Friday, 14 December 2018

Unable to Start WebLogic Admin Server after clearing some old log files

Problem :-
While restarting the Admin Server of SOA in DEV Environment getting below error because Disk was 100% full. Admin server failed to start after clearing some old log files from the server
Solution :-
Need to delete the old log files from this path—
–$DOMAIN_HOME/servers/AdminServer/logs/
Below is the command for deleting X days old files
$ find . -mtime +X(days) -exec rm {} \;
Before Error :-
$ df -h .
Filesystem Size  Used Avail Use% Mounted on
/dev/mapper/vg00-lv_local_mnt  230G  218G  511M 100% /local/mnt
After Error :-
$ df -h .
Filesystem Size  Used Avail Use% Mounted on
/dev/mapper/vg00-lv_local_mnt   230G  167G   52G  77% /local/mnt
After deleted the old log files from Admin server still having issue with restart the admin server and below is the error message from Admin server log file.
$DOMAIN_HOME/servers/AdminServer/logs/AdminServer.log
<Critical> <WebLogicServer> <BEA-000386> <Server subsystem failed. Reason: java.lang.NumberFormatException: null
java.lang.NumberFormatException: null
Since error was point to embedded LDAP server for weblogic so I compared files related to embedded ldap server
( $DOMAIN_HOME/SERVERS/AdminServer/data/ldap/)with one of our running weblogic instance and found that size of replicas.prop file was 0 byte.
$DOMAIN_HOME/servers/AdminServer/data/ldap/conf
-rw-r—– 1 oraowc dba   0 Aug 13 14:33 replicas.prop
Solutions:-
1) – Open and add the below line in this (replicas.prop) file $DOMAIN_HOME/servers/AdminServer/data/ldap/conf/replicas.prop
replica.num=0
or
2) – Move file from below location $DOMAIN_HOME/servers/AdminServer/data/ldap/conf/replicas.prop to replicas.prop.bak
mv replicas.prop replicas.prop_27092017   (On Restart WebLogic Server will recreate this file)

ERP SOA service is unable to access the end point(s)

Issue:-
ERP SOA Service attempts to reply and gets the error and unable to access the endpoint(s):
Issue Summary:-
Following error is found in SOA Server logs.
javax.xml.ws.WebServiceException: javax.xml.soap.SOAPException: javax.xml.soap.SOAPException: Message send failed: java.lang.RuntimeException: Unexpected error: java.security.InvalidAlgorithmParameterException: the trustAnchors parameter must be non-empty
Resolution:-
Issue is resolved after adding the “trustAnchors” parameter in setDomainEnv.sh file.
Resolution Details:-
Issue is resolved after adding the following “trustAnchors” parameter.
“-Djavax.net.ssl.trustAnchors=java_home /jre/lib/security/cacerts” to setDomainEnv.sh. This was not required with older version of the JAVA. And after upgrade, it is not able to read TrustAnchors definition from server definitions (Home >Summary of Servers >managed_server> Keystores).

How to import MDS metadata from oracle 11g EM to 12c EM Console

1. Export MDS from 11g EM console.
2. Import MDS to 12c EM console.
  • Export MDS from 11g EM Console: 
    • MDS in 11g will be exported as the ZIP file.
    • Steps to export MDS and save ZIP in the local system.
      • Login into 11g EM console.
      • Navigate to MDS Configuration.
      • Export and save MDS .zip file.
  • Login to 11g EM Console –> Expand SOA and Right click on soa-infra –> Select Administration –>MDS Configuration.
Click on MDS Configuration and Export MDS Zip to the local system. It will have saved into Zip format.
  • Import 11g MDS to 12c EM Console:
    • 12c EM Console to import MDS from the local system.
    • Steps to Import MDS:
      • Unzip the exported MDS.
      • Select the Required MDS.
      • Make a ZIP to required MDS.
      • Login into 12c EM Console.
      • Navigate to MDS Configuration.
      • Import MDS zip file.
  • Login into 12c EM Console –> Expand Target Navigation –> Expand SOA –> Right Click on soa-infra. Select Administration –> MDS Configuration.
Click on MDS Configuration and below screen will be displayed. Then Click on Choose File (Select Zip file from local system) and click on Import.
Now MDS is successfully imported into 12c EM Console.